Get Started
code-inspector-plugin supports usage in projects using webpack/vite/rspack/nextjs/nuxt/umijs as bundlers and works with frameworks such as vue/react/preact/solid/qwik/svelte/astro. Please refer to the integration tutorial below.
Installation
- Use npm:
npm install code-inspector-plugin -D- Use yarn:
yarn add code-inspector-plugin -D- Use pnpm:
pnpm add code-inspector-plugin -DConfiguration
1.Config bundler
Click to expand configuration about: webpack
// webpack.config.js
const { codeInspectorPlugin } = require('code-inspector-plugin');

module.exports = () => ({
  plugins: [
    codeInspectorPlugin({
      bundler: 'webpack',
    }),
  ],
});
Click to expand configuration about: vite
// vite.config.js
import { defineConfig } from 'vite';
import { codeInspectorPlugin } from 'code-inspector-plugin';

export default defineConfig({
  plugins: [
    codeInspectorPlugin({
      bundler: 'vite',
    }),
  ],
});
Click to expand configuration about: rspack
// rspack.config.js
const { codeInspectorPlugin } = require('code-inspector-plugin');

module.exports =  = {
  // other config...
  plugins: [
    codeInspectorPlugin({
      bundler: 'rspack',
    }),
    // other plugins...
  ],
};
Click to expand configuration about: rsbuild
// rsbuild.config.js
import { defineConfig } from '@rsbuild/core';
const { codeInspectorPlugin } = require('code-inspector-plugin');

export default defineConfig({
  // ...other config
  tools: {
    rspack: {
      plugins: [
        codeInspectorPlugin({
          bundler: 'rspack',
        }),
      ],
    },
  },
});
Click to expand configuration about: vue-cli
// vue.config.js
const { codeInspectorPlugin } = require('code-inspector-plugin');

module.exports = {
  // ...other code
  chainWebpack: (config) => {
    config.plugin('code-inspector-plugin').use(
      codeInspectorPlugin({
        bundler: 'webpack',
      })
    );
  },
};
Click to expand configuration about: nuxt
nuxt3.x :
// nuxt.config.js
import { codeInspectorPlugin } from 'code-inspector-plugin';

// https://nuxt.com/docs/api/configuration/nuxt-config
export default defineNuxtConfig({
  vite: {
    plugins: [codeInspectorPlugin({ bundler: 'vite' })],
  },
});
nuxt2.x :
// nuxt.config.js
import { codeInspectorPlugin } from 'code-inspector-plugin';

export default {
  build: {
    extend(config) {
      config.plugins.push(codeInspectorPlugin({ bundler: 'webpack' }));
      return config;
    },
  },
};
Click to expand configuration about: next.js
// next.config.js
const { codeInspectorPlugin } = require('code-inspector-plugin');

const nextConfig = {
  webpack: (config, { dev, isServer }) => {
    config.plugins.push(codeInspectorPlugin({ bundler: 'webpack' }));
    return config;
  },
};

module.exports = nextConfig;
Click to expand configuration about: umi.js
// umi.config.js or umirc.js
import { defineConfig } from '@umijs/max';
import { codeInspectorPlugin } from 'code-inspector-plugin';

export default defineConfig({
  chainWebpack(memo) {
    memo.plugin('code-inspector-plugin').use(
      codeInspectorPlugin({
        bundler: 'webpack',
      })
    );
  },
  // other config
});
Click to expand configuration about: astro
// astro.config.mjs
import { defineConfig } from 'astro/config';
import { codeInspectorPlugin } from 'code-inspector-plugin';

export default defineConfig({
  vite: {
    plugins: [codeInspectorPlugin({ bundler: 'vite' })],
  },
});
2.Config VSCode
For Windows or other IDEs, you can skip this step
This step is only necessary if your computer is a Mac, and you are using VSCode as your IDE. You can skip this step if your computer is Windows or you use another IDE.
Execution
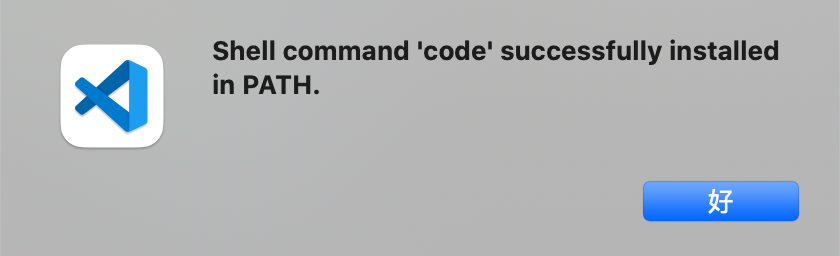
command + shift + pin vscode, search and clickShell Command: Install 'code' command in PATH:
If the prompt window appears as shown below, the configuration is successful:
Usage
Currently, there are two ways to use the DOM source code positioning feature:
Method1(Recommend)
When holding down the specified shortcut keys on the page, a mask layer will appear on the DOM with relevant information as you move the mouse on the page. Clicking it will automatically open the IDE and position the cursor to the code location corresponding to the element. (The default shortcut keys for Mac are Option + Shift; for Windows, the default shortcut keys are Alt + Shift, and relevant shortcut key prompts will be output in the browser console.) 
Method2
When the showSwitch: true option is configured in the plugin parameters, a Code Inspection Switch Button will be displayed on the page. Clicking it will toggle the Code Inspection Mode on/off. When Code Inspection Mode is enabled, use it the same way as in Method1 by holding down the shortcut keys. When the switch is in color ,
Code Inspection Mode is enabled; when the switch is colorless ![]() ,
, Code Inspection Mode is disabled.
